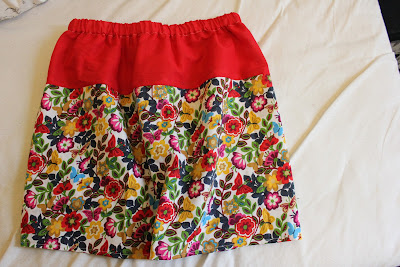
In June when I was still in the UK and had my sewing machine I decided to get working on a present for Bailey, who was my inspiration for all this creation as well as blogging. As I have mentioned in a previous blog post, she made me such a beautiful quilt for Christmas one year and I can't get over how wonderful it is. It was her 21st this July so I wanted to make her something nice with my improved sewing skills. I had some fabric that suited her perfectly but there wasn't that much. I was toying with the idea of a bag or purse but she has made them in the past probably better than I could have made. I found this tutorial and really wanted to try it out but I didn't have enough of the fabric I had saved for Bailey. So, I bought some red cotton that coordinated with it and it worked so well.
I followed the instructions mostly apart from the fact I sewed a strip of red cotton onto the end of my patterned fabric - both to make the skirt long enough and to add a little something to it. Even though it is risky making clothes for people with no measurements (otherwise it would have ruined the surprise!) I wasn't too worried as it was a elasticated waist so there was a big leeway - also I could have quite easily shortened the elastic or brought up the hem to fit after I gave it to her. I made a huge mistake at the beginning and started to cut the fabric in half before I realised I didn't want to, so it worked out okay in the end as I could cover the cut bit with the red.
I made another mistake when I wasn't following the instructions properly and made things difficult for myself - sewed up the ends to make the skirt before hemming or putting the elastic in! It wasn't a huge problem with the hemming (just a bit more fiddly) but I had to undo the stitching to get the elastic in, and redo it when I had done it.
As a pointer, once you have the elastic through you can safety pin one end to the other so you can try it on and amend as you like without the risk of you losing the end of elastic. I had to look at pictures of Bailey and I and decided we were about the same size so measured the skirt on myself to fit.
I also hemmed this skirt properly so there isn't an ugly fraying seam under the skirt. I'm learning new things all the time.
I love the way it turned out and she was delighted with the skirt. I'm definitely going to make one for myself! In my next post I'll show you the little matching something I gave her with the skirt.


Jessie: I received both of your questions and comments on my post 'Turn Children's Art into Tea Towels' at Setting for Four and I had replied to both of them....however I just realized you are a 'No Reply Blogger' which means that when you comment on a blog's post, your comments are left with a 'no reply' email attachment so the blogger cannot reply to it! To prevent this, you can adjust your Blogger profile settings so that a blogger can reply to your comments. There is a good article here at Turnstyle Vogue that you can read to explain this here http://www.turnstylevogue.com/2012/02/replying-to-comments/
ReplyDeleteTo answer your questions here....Sharpie permanent markers contain permanent ink so the ink when dried is permanent. The graphic does not disappear or 'bleed out' when washed. I wash my towels in cold water and hang to dry since they dry so quickly there is no point in placing them in the dryer.
Unfortuneatly, I could not find an email address to email you in your About Me page or anywhere else on your blog (or I would have emailed this to you directly) so I am leaving this info here in this post in the hopes that you get the info. Hope this helps, Heather
Thanks Heather!
ReplyDelete